The RestroPress Checkout.com Payment Gateway connects your RestroPress restaurant ordering system to Checkout.com. The plugin embeds Checkout.com Frames to safely collect card details on your checkout page, processes transactions, supports 3D Secure (3DS) verification, and captures payments to complete RestroPress orders automatically.
Key Features
- Checkout.com Frames Integration: Uses Checkout.com’s secure Frames library to embed PCI-compliant hosted card fields directly into your checkout form.
- Immediate or Deferred Capture: Toggle the immediate capture setting to either capture funds instantly at checkout or authorize them for manual capture later.
- Processing Channel ID Support: Includes an optional field to specify a Processing Channel ID, allowing you to route transactions through specific merchant accounts or channels.
- 3D Secure (3DS) Compliance: Processes 3D Secure verification requests during the checkout flow to prevent fraudulent transactions.
- Automated Webhook Updates: Receives event notifications from Checkout.com to transition order statuses in real-time.
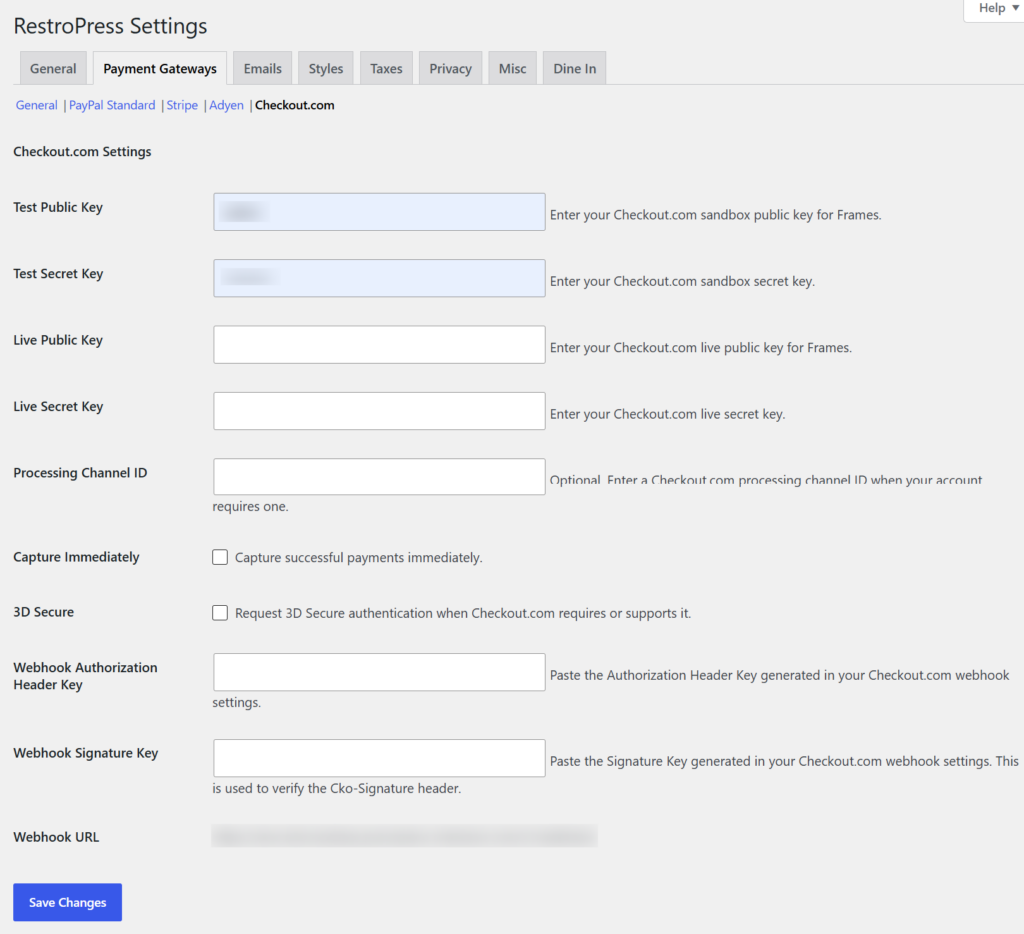
Admin Configuration Fields
The extension adds a dedicated settings panel under RestroPress > Settings > Payment Gateways > Checkout.com containing:
- Public Key (Separate fields for Test and Live keys)
- Secret Key (Separate fields for Test and Live keys)
- Processing Channel ID (Optional field for transaction routing)
- Immediate Capture: A checkbox to enable or disable instant capture of funds.
- 3D Secure: A checkbox to enforce 3DS verification.
- Webhook URL Display: Shows the destination URL to configure in the Checkout.com Dashboard.
- Webhook Signature Key: Field to enter your webhook signature key for verifying incoming payloads.
How to Install & Configure
- Upload the
restropress-checkout-com-payment-gateway folder to the /wp-content/plugins/ directory.
- Activate the plugin from the WordPress Plugins screen.
- Navigate to RestroPress > Settings > Payment Gateways and enable Checkout.com.
- Click on the Checkout.com settings tab and enter your Public and Secret Keys.
- Copy the Webhook URL displayed in the settings panel, paste it into your Checkout.com Dashboard to listen for payment events, and enter your Webhook Signature Key in the settings page to secure the integration.